

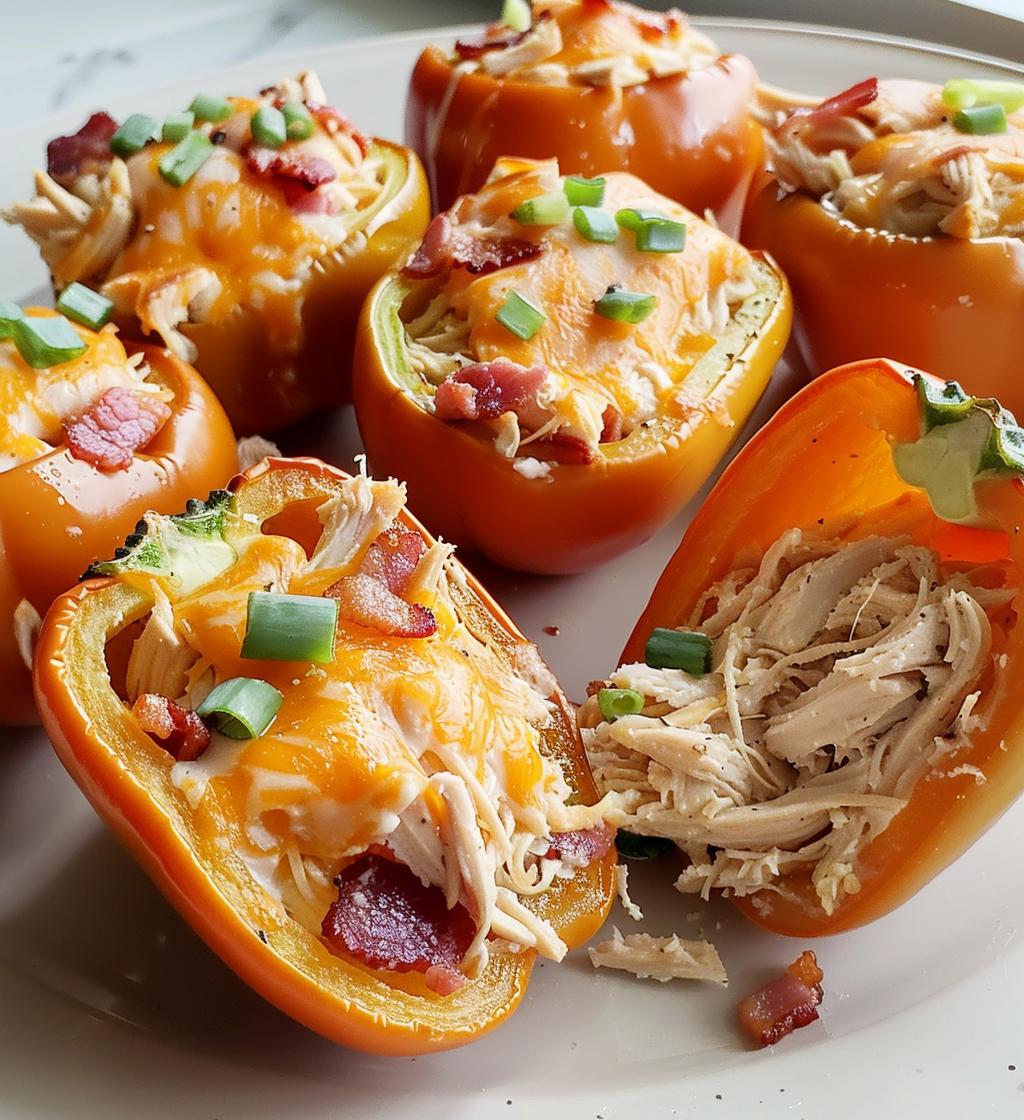
Oh my goodness, let me tell you about these Keto Chicken Bacon Boats! They’re a game changer when it comes to low-carb meals. Picture this: tender bell peppers stuffed to the brim with a creamy, cheesy filling of shredded chicken, crispy bacon, and a sprinkle of green onions. It’s like a flavor explosion in every bite! Not only are they absolutely delicious, but they’re also super easy to whip up, making them perfect for a quick weeknight dinner or meal prep. Trust me, once you try these, you’ll be hooked on this satisfying, guilt-free goodness!
Ingredients List
- 2 cups cooked shredded chicken – You can use rotisserie chicken for a quick option!
- 1 cup cream cheese, softened – This is the secret to that creamy texture!
- 1 cup shredded cheddar cheese – A must for that cheesy goodness!
- 1/2 cup cooked bacon, chopped – Crispy bacon makes everything better, right?
- 1/4 cup green onions, chopped – Adds a fresh crunch!
- 1 teaspoon garlic powder – For that savory kick!
- 1 teaspoon onion powder – A little extra flavor never hurt!
- Salt, to taste – Season it up to your liking!
- Black pepper, to taste – A sprinkle or two will do!
- 4 large bell peppers, halved – These are going to hold all that delicious filling!
How to Prepare Keto Chicken Bacon Boats
Preheat the Oven
Alright, let’s get started! First things first, you’ll want to preheat your oven to 375°F (190°C). This step is super important because it ensures your Keto Chicken Bacon Boats bake evenly and get that lovely bubbly cheese you’re dreaming about. So go ahead and set that oven while you prep the filling!
Mix the Filling
Now, grab a large bowl because it’s time to mix all those delicious ingredients together. Toss in your cooked shredded chicken, softened cream cheese, shredded cheddar cheese, chopped bacon, and green onions. Don’t forget the garlic powder and onion powder! These little flavor bombs will take your filling to the next level. Sprinkle in some salt and black pepper to taste, then get in there with a fork or spatula and mix everything together until it’s all well combined. You want a nice creamy consistency, so don’t rush this part!
Stuff the Peppers
Once your filling is ready, it’s time to stuff those bell pepper halves! Take each pepper half and scoop a generous amount of that creamy chicken mixture into it. I like to really pack it in there because the more filling, the better! Once they’re all stuffed, place the peppers snugly in a baking dish. They’re going to bake beautifully together!
Bake the Peppers
Now it’s showtime! Slide your baking dish into the preheated oven and let those beauties bake for about 25-30 minutes. You’ll want to keep an eye on them until the peppers are tender and the cheese is all bubbly and golden. Ah, that smell! Once they’re done, take them out and let them cool for just a few minutes before serving. Trust me, the wait is worth it!
Nutritional Information
Alright, let’s talk numbers! Here’s the estimated nutritional breakdown per serving for these delightful Keto Chicken Bacon Boats. Keep in mind, these values can vary based on your specific ingredients, so consider this a rough guide:
- Calories: 300
- Fat: 20g
- Saturated Fat: 10g
- Unsaturated Fat: 8g
- Trans Fat: 0g
- Cholesterol: 90mg
- Sodium: 600mg
- Carbohydrates: 6g
- Fiber: 2g
- Sugar: 2g
- Protein: 25g
So, you can enjoy these tasty boats guilt-free while staying on track with your low-carb goals! How awesome is that?
Why You’ll Love This Recipe
- Quick to Prepare: You can whip these up in no time, making them perfect for busy weeknights!
- Low Carb Delight: These Keto Chicken Bacon Boats are a fantastic low-carb option that won’t leave you feeling deprived!
- Packed with Flavor: The combination of creamy cheese, savory bacon, and tender chicken creates a flavor explosion in every bite!
- Customizable: Feel free to switch up the ingredients to suit your taste—add different veggies or spices for a fun twist!
- Meal Prep Friendly: These boats are great for meal prep; make a big batch and enjoy them throughout the week!
- Kid-Friendly: Even picky eaters will love these tasty boats, making family dinners a breeze!
- One-Pan Wonder: Less mess in the kitchen means more time to enjoy your delicious creation!
Tips for Success
Now, let’s make sure your Keto Chicken Bacon Boats turn out absolutely perfect! Here are some of my favorite tips to elevate your cooking game:
- Use Leftover Chicken: If you have some leftover rotisserie chicken or any cooked chicken on hand, this recipe is a fantastic way to use it up! It saves time and adds even more flavor.
- Adjust the Spices: Don’t be afraid to tweak the spices! If you love a bit of heat, add some cayenne pepper or red pepper flakes. Want it herby? Toss in some dried oregano or basil for a delicious twist!
- Ensure Tender Peppers: Keep an eye on your bell peppers while they bake. If they’re still a bit crunchy after 30 minutes, give them a few extra minutes in the oven. You want them tender but not mushy!
- Mix It Up: Feel free to get creative with your fillings! Try adding in some chopped spinach or mushrooms for extra veggies, or even switch up the cheese for a different flavor profile.
- Don’t Overstuff: While it’s tempting to pack in as much filling as possible, leaving a little space can help the peppers cook evenly and prevent any spillage in the oven. Just a little caution goes a long way!
- Let Them Cool: After baking, give your boats a few minutes to cool. This helps the cheese set a bit and makes them easier to handle when serving.
With these tips, you’ll be well on your way to making the most delicious Keto Chicken Bacon Boats ever. Enjoy every bite!
Variations
If you’re feeling adventurous or just want to mix things up a bit, there are so many fun ways to customize your Keto Chicken Bacon Boats! Here are some of my favorite variations that’ll keep your taste buds excited:
- Cheese Swap: Try using different cheeses like pepper jack for a spicy kick or mozzarella for a milder, gooey texture. You could even mix a couple of cheeses for a cheesy masterpiece!
- Veggie Boost: Add some sautéed vegetables like spinach, zucchini, or mushrooms to the filling for extra nutrition and flavor. It’s a great way to sneak in some greens!
- Different Meats: Switch things up by using ground turkey or beef instead of chicken! You could even go for shredded pork for a delicious BBQ twist!
- Herb It Up: Fresh herbs like parsley, cilantro, or basil can bring a whole new level of freshness to your filling. Just chop them up and mix them in before stuffing the peppers!
- Spicy Kick: If you love heat, toss in some jalapeños or switch the bacon for spicy sausage. It’s a fantastic way to amp up the flavor!
- Sweet Twist: For a unique flavor, try adding a bit of diced pineapple or BBQ sauce to the filling. It creates a sweet-savory combo that is just divine!
With these variations, you can create a new favorite every time you make Keto Chicken Bacon Boats. Get creative and have fun with it—it’s all about what you love to eat!
Storage & Reheating Instructions
Now, let’s talk about how to keep those delicious Keto Chicken Bacon Boats fresh for later! If you find yourself with leftovers (which is rare because they’re so good!), just pop them in an airtight container. They’ll stay fresh in the fridge for up to 4 days—perfect for quick lunches or snacks!
When it’s time to enjoy them again, you’ll want to reheat them properly to keep that cheesy goodness intact. Just preheat your oven to 350°F (175°C) and place the stuffed peppers on a baking sheet. Cover them loosely with aluminum foil to keep the moisture in and prevent over-browning. Bake for about 15-20 minutes, or until they’re heated through. You can also microwave them if you’re in a hurry—just pop one on a microwave-safe plate and heat it for about 1-2 minutes. Easy peasy!
And there you have it! With these storage and reheating tips, you can savor every last bite of your Keto Chicken Bacon Boats. Enjoy the convenience and deliciousness, my friend!
Print
Orange Pistachio Cake
- Prep Time: 20 minutes
- Cook Time: 50 minutes
- Total Time: 1 hour 10 minutes
- Yield: 8 servings 1x
- Category: Dessert
- Method: Baking
- Cuisine: American
- Diet: Vegetarian
Description
A delightful Orange Pistachio Cake that combines zesty orange and crunchy pistachios for a refreshing and satisfying dessert.
Ingredients
- 1 1/2 cups (190g) all-purpose flour
- 1 tsp baking powder
- 1/2 tsp baking soda
- 1/4 tsp salt
- 1/2 cup (115g) unsalted butter, softened
- 3 large eggs
- 1/2 cup (120ml) plain yogurt
- Zest of 2 oranges
- 1 tsp vanilla extract
- 1/2 cup (75g) chopped dates
- 1/2 cup (50g) chopped pistachios, plus extra for topping
- 2 tbsp fresh orange juice
For the syrup, you will need:
- 1/2 cup (100g) sugar
- 1/4 cup (60ml) orange juice
- 1/4 cup (60ml) water
- 1/2 tsp vanilla extract
- 2 tbsp chopped pistachios for garnish
Instructions
- Preheat your oven to 350°F (175°C) and prepare a 9-inch round cake pan.
- In a medium bowl, whisk together the flour, baking powder, baking soda, and salt.
- Cream the butter and sugar until light and fluffy, then add eggs one at a time, mixing well.
- Stir in yogurt, orange zest, orange juice, and vanilla extract.
- Fold the dry ingredients into the wet mixture until just combined, then fold in dates and pistachios.
- Pour the batter into the prepared pan and bake for 45-50 minutes.
- Let the cake cool in the pan for 10 minutes, then transfer to a wire rack.
- Prepare the syrup and pour it over the cooled cake.
Notes
- Use fresh ingredients for the best flavor.
- Ensure all ingredients are at room temperature before mixing.
- Store leftovers in an airtight container for up to three days.
- This cake can be made gluten-free or vegan with appropriate substitutions.
Nutrition
- Serving Size: 1 slice
- Calories: 320
- Sugar: 18g
- Sodium: 150mg
- Fat: 15g
- Saturated Fat: 8g
- Unsaturated Fat: 5g
- Trans Fat: 0g
- Carbohydrates: 42g
- Fiber: 2g
- Protein: 6g
- Cholesterol: 70mg
Keywords: Orange Pistachio Cake, dessert, baking, cake recipe