

Oh, the holiday season! There’s just something magical about the scent of fresh-baked sweets wafting through the house, isn’t there? I get so giddy thinking about all the festive baking! One of my absolute favorites to whip up are these delightful Christmas scones. They’re the perfect blend of buttery goodness and festive flavors, making them an absolute must-have for any holiday gathering. Trust me, when you take a bite of these warm scones, with their bursts of tart cranberries and crunchy pecans, you’ll feel like you’re wrapped in a cozy blanket by the fire.
In this recipe, I’m sharing my simple yet delicious take on these festive treats. With just a handful of ingredients and a quick 35-minute bake time, you’ll have a batch of golden-brown scones that are sure to impress your friends and family. Plus, they’re incredibly versatile! You can serve them warm with a dollop of jam or cream, or simply enjoy them as they are with a cup of tea. Let’s dive in and make some holiday magic happen in the kitchen!
Ingredients
- 2 cups all-purpose flour – Make sure it’s spooned into your measuring cup, so it’s light and fluffy.
- 1/4 cup sugar – This adds just the right amount of sweetness to balance the tartness of the cranberries.
- 1 tablespoon baking powder – This is what makes our scones rise beautifully!
- 1/2 teaspoon salt – A pinch to enhance all those lovely flavors.
- 1/2 cup unsalted butter, cold and cubed – I like to keep my butter in the fridge until I’m ready to use it; cold butter gives the scones that flaky texture we love.
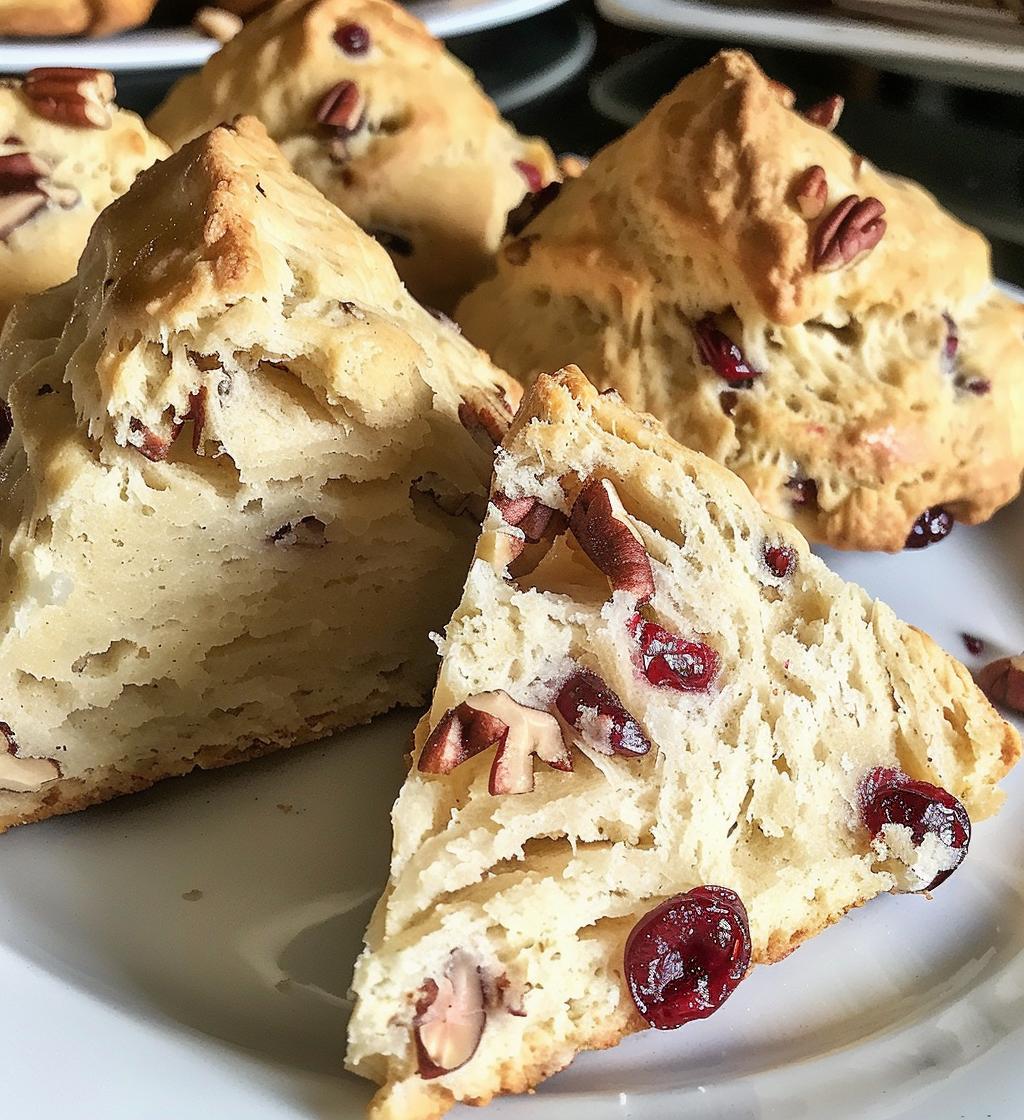
- 1/2 cup dried cranberries – These little gems are bursting with flavor and add a festive touch!
- 1/4 cup chopped pecans – For that delightful crunch and nutty flavor; feel free to toast them for extra yum!
- 1/2 teaspoon cinnamon – Ah, the scent of cinnamon is just perfect for the holidays!
- 1/2 cup milk – This adds moisture to the dough; I usually go for whole milk for creaminess.
- 1 egg – This helps bind everything together and gives the scones a lovely golden color.
How to Prepare Christmas Scones
Alright, let’s get those festive vibes rolling! Making Christmas scones is easier than you might think, and I promise you’ll be amazed at how quickly they come together. Grab your apron, and let’s get baking!
Step-by-Step Instructions
- Preheat your oven: First things first, preheat your oven to 400°F (200°C). This step is key because starting with a hot oven helps our scones rise beautifully!
- Mix the dry ingredients: In a large mixing bowl, whisk together the flour, sugar, baking powder, salt, and cinnamon. Make sure they’re well combined—this helps the flavors spread evenly throughout the scones!
- Add the butter: Now, it’s time to bring in the cold, cubed butter. Using your fingers or a pastry cutter, mix it into the dry ingredients until the mixture resembles coarse crumbs. You want to see little pea-sized pieces of butter; this is what gives the scones that delightful flaky texture!
- Stir in the mix-ins: Toss in those dried cranberries and chopped pecans. Give it a gentle stir to distribute them evenly—this is where the magic happens!
- Combine the wet ingredients: In a separate bowl, whisk together the milk and egg until well blended. This is the secret sauce that binds everything together!
- Mix it all together: Pour the milk mixture into the dry ingredients and stir until just combined. Be careful not to overmix; a few lumps are perfectly fine. We want our scones to be tender and light!
- Knead the dough: Turn the dough out onto a lightly floured surface. Gently knead it just a couple of times until it comes together. Don’t go crazy here; we want that tender texture, remember?
- Shape and cut: Form the dough into a circle about 1-inch thick. Use a sharp knife to cut it into wedges—think pizza! Place the wedges on a baking sheet lined with parchment paper, leaving a little space between each one.
- Bake to perfection: Pop those beauties into the oven and let them bake for 15-20 minutes, or until they’re golden brown. Oh, the smell will be heavenly!
- Cool and serve: Once they’re done, take them out and let them cool for a few minutes on the baking sheet before transferring to a wire rack. Serve them warm, and don’t forget the jam or cream!
And there you have it! Your very own batch of delightful Christmas scones. Enjoy the process, and let the holiday spirit fill your kitchen!
Why You’ll Love This Recipe
- Quick and easy to make—perfect for holiday mornings or last-minute treats!
- Festive flavors that capture the spirit of Christmas in every bite.
- Buttery and flaky texture that’s simply irresistible.
- Customizable with your favorite mix-ins—try chocolate chips or other dried fruits!
- Ideal for sharing at gatherings or cozy family breakfasts.
- Delicious served warm with jam or cream, making them extra special.
- They make your kitchen smell amazing, creating that cozy holiday atmosphere.
Tips for Success
Alright, let’s make sure your Christmas scones turn out absolutely perfect! I’ve got some tried-and-true tips that will elevate your scone game and ensure you impress everyone with your baking skills!
- Use cold ingredients: Keep your butter and milk cold before mixing. This helps create that lovely flaky texture we all love. I often pop the butter in the freezer for a few minutes before cubing it!
- Don’t overmix: When you’re combining the wet and dry ingredients, remember that a few lumps are okay! Overmixing can lead to tough scones, and we definitely don’t want that.
- Flour your surface: When kneading the dough, use just enough flour to prevent sticking. Too much flour can make your scones dense, and we want them light and fluffy!
- Shape carefully: When forming your dough into a circle, try not to compress it too much. The less you handle the dough, the more tender your scones will be!
- Check for doneness: Keep an eye on your scones while they bake! They should be golden brown on top and firm to the touch. If they look a little pale, give them a few more minutes.
- Serve fresh: These scones are best enjoyed warm right out of the oven. If you have leftovers, just reheat them in the oven for a few minutes to bring back that fresh-baked goodness.
- Experiment with flavors: Don’t be afraid to get creative! Swap out the cranberries and pecans for other dried fruits or nuts you love. Your scones can be as unique as your holiday spirit!
With these tips in your back pocket, you’re all set to bake up a storm! Enjoy the process and embrace the joy of holiday baking with these delicious Christmas scones. Happy baking!
Nutritional Information
Now, I want to share a little about the nutritional side of these delightful Christmas scones. Keep in mind that the nutritional values can vary based on the specific ingredients and brands you use, so these numbers are just a guideline to help you out!
- Serving Size: 1 scone
- Calories: 180
- Sugar: 6g
- Sodium: 150mg
- Fat: 8g
- Saturated Fat: 5g
- Unsaturated Fat: 2g
- Trans Fat: 0g
- Carbohydrates: 24g
- Fiber: 1g
- Protein: 3g
- Cholesterol: 25mg
So, while you’re enjoying these scrumptious scones, remember they’re also bringing a little bit of goodness to your holiday celebrations. Enjoy every bite, and happy baking!
FAQ Section
Got questions about making these delightful Christmas scones? No worries! I’ve gathered some of the most common queries to help you out. Let’s dive in!
Can I use fresh cranberries instead of dried?
Oh, you certainly can! Just keep in mind that fresh cranberries are much more tart, so you might want to add a little extra sugar to balance that out. They’ll add a lovely burst of freshness to your scones!
How should I store leftover scones?
To keep your Christmas scones fresh, store them in an airtight container at room temperature for a couple of days. If you want to keep them longer, pop them in the fridge, or even freeze them! Just make sure to wrap them tightly.
Can I make the dough ahead of time?
Absolutely! You can prepare the dough ahead of time, just wrap it tightly in plastic wrap and refrigerate. When you’re ready to bake, let it sit at room temperature for about 15 minutes before shaping and cutting. Easy peasy!
Can I add different nuts or fruits?
Yes, yes, yes! Feel free to swap out the pecans for walnuts or almonds or mix in some chocolate chips or other dried fruits—like apricots or raisins. Personalizing your Christmas scones is part of the fun!
What’s the best way to reheat scones?
The best way to bring back that fresh-baked goodness is to reheat them in the oven. Just pop them in at 350°F (175°C) for about 5-10 minutes. They’ll be warm and delicious, just like when they came out of the oven!
With these answers in hand, you’re all set to bake your heart out this holiday season! Enjoy making those scrumptious Christmas scones!
Storage & Reheating Instructions
Now that you’ve baked up a delightful batch of Christmas scones, let’s talk about how to keep them fresh and reheated for maximum enjoyment! After all, we want to savor every last crumb of these festive treats!
To store your leftover scones, simply place them in an airtight container at room temperature. They’ll stay fresh for about 2 days, which is perfect for enjoying them with your morning coffee or as an afternoon snack. If you want to keep them a bit longer, you can pop them in the fridge, where they’ll last for about a week. Just make sure they’re sealed tightly to prevent them from drying out!
If you find yourself with more scones than you can eat right away (lucky you!), you can freeze them! Wrap each scone individually in plastic wrap and then place them in a zip-top freezer bag. They’ll stay good for up to 2 months! When you’re ready to enjoy them, just pull out the number you want and let them thaw in the refrigerator overnight.
Now, let’s talk reheating! To bring back that fresh-baked warmth, preheat your oven to 350°F (175°C). Place the scones on a baking sheet and let them warm up for about 5-10 minutes. This will help restore their delightful texture and make your kitchen smell amazing again!
And there you have it—simple tips to keep your Christmas scones fresh and delicious! Now, you can enjoy them for days without losing that scrumptious taste! Happy baking and happy snacking!