

The holiday season is just around the corner, and you know what that means—it’s time to whip up some delightful Christmas candy! There’s something magical about making these sweet treats that fills the air with a festive spirit. I remember the first time I made this candy; my kitchen was a whirlwind of color and sweet scents, and I couldn’t help but feel giddy with excitement as I poured the hot mixture onto the baking sheet. What makes this recipe stand out is how simple it is, yet it yields such a vibrant and tasty result. Plus, it’s the perfect project to involve the kids or share with friends. Trust me, once you start making this candy, you won’t be able to stop at just one batch—it’s like a holiday tradition waiting to happen!
Ingredients List
Gather these simple ingredients, and you’ll be well on your way to making your own festive Christmas candy! Here’s what you’ll need:
- 2 cups sugar
- 1 cup corn syrup
- 1/2 cup water
- 1 teaspoon peppermint extract
- Red and green food coloring
- 1 cup crushed candy canes
How to Prepare Christmas Candy
Making Christmas candy is an exciting process that fills your kitchen with festive aromas! Just follow these steps, and you’ll be on your way to creating beautiful, crunchy treats.
Step-by-Step Instructions
- Start by combining the sugar, corn syrup, and water in a medium saucepan. It’s easier to manage if you use a heavy-bottomed pot to prevent any burning.
- Place the saucepan over medium heat and stir gently until the sugar is fully dissolved. Just keep an eye on it, and don’t rush this step!
- Once the mixture is bubbling away and all the sugar has dissolved, stop stirring. This is super important—don’t stir once it starts boiling! Let it boil undisturbed until it reaches 300°F (that’s the hard crack stage). You’ll want to use a candy thermometer, as the temperature is crucial for getting that perfect crunch.
- As it cooks, keep an eye on the color. It should become a lovely golden hue, which means you’re getting close!
- Once it hits 300°F, carefully remove it from the heat. Add in the peppermint extract and a few drops of red and green food coloring—feel free to swirl it for a marbled effect!
- Quickly pour the mixture onto a greased baking sheet, spreading it out evenly. Be cautious, as the mixture is extremely hot!
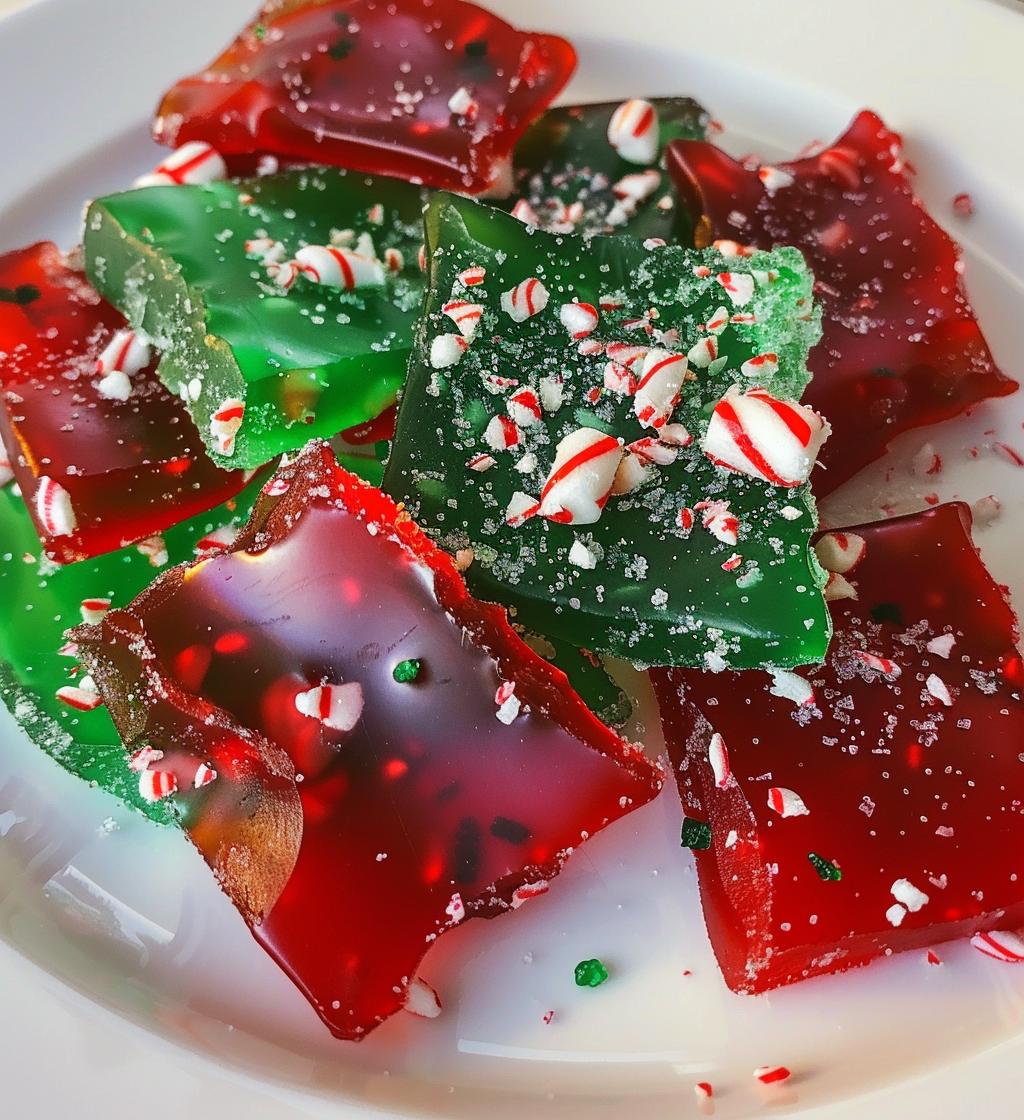
- Before it sets completely, sprinkle the crushed candy canes over the top for a festive crunch.
- Let it cool completely at room temperature, then break it into pieces. Oops, don’t forget to taste a piece or two!
Why You’ll Love This Recipe
This Christmas candy is not just a treat; it’s an experience! Here’s why you’ll adore making it:
- Quick to whip up: You’ll have delicious candy ready in just 25 minutes!
- Festive flavors: The peppermint and candy cane combination brings that classic holiday taste to life.
- Fun for all ages: Involve the kids in pouring and decorating—it’s a great way to bond during the holidays!
- Vibrant colors: The red and green food coloring makes it visually stunning—perfect for holiday gift-giving!
- Customizable: You can easily swap out extracts or toppings to create your own unique version.
- Perfect for sharing: This candy makes a lovely addition to holiday treat trays or as a thoughtful gift for friends and neighbors.
- It’s a holiday tradition waiting to happen: Once you make it, you’ll want to keep this delightful recipe in your holiday lineup every year!
Tips for Success
Want to make sure your Christmas candy turns out perfectly? Here are my top tips for success that will have you feeling like a candy-making pro!
- Use a candy thermometer: This tool is your best friend! It takes the guesswork out of knowing when your mixture has reached that magical 300°F for the hard crack stage. Trust me, investing in a good one is worth it!
- Keep an eye on your mixture: As it cooks, don’t walk away! The candy can go from perfect to burnt in a flash. Stay close and watch for that lovely golden color.
- Don’t stir once boiling: I can’t stress this enough! Once your mixture starts boiling, let it do its thing without stirring. This is crucial for achieving that ideal texture.
- Prep your workspace: Before you start cooking, make sure your baking sheet is greased and ready to go. The candy sets quickly, so you won’t want to scramble at the last minute!
- Be cautious with hot sugar: The candy mixture will be extremely hot, so use oven mitts and be careful when pouring it onto the baking sheet. It’s super easy to get burned!
- Cool completely: Let the candy cool completely before breaking it into pieces. This will ensure it sets properly and has that satisfying crunch!
With these tips in hand, you’ll be on your way to making the best Christmas candy ever! Enjoy the process, and don’t forget to have a little fun along the way!
Variations
If you’re feeling adventurous and want to mix things up with your Christmas candy, I’ve got some fun variations that are sure to impress! Here are a few ideas to get your creative juices flowing:
- Different extracts: Swap out the peppermint for other flavors like almond, vanilla, or even orange extract! Each one gives a unique twist to the candy and can surprise your taste buds.
- Add nuts: For a delightful crunch, consider mixing in some chopped nuts like almonds or pecans right after you pour the candy onto the baking sheet. Just be sure they’re finely chopped so they integrate nicely!
- Color variations: Instead of the classic red and green, why not try blue and white for a winter wonderland effect? Or go all out with rainbow colors for a fun twist that kids will love!
- Spiced version: Add a pinch of cinnamon or nutmeg to the sugar mixture before boiling for a warm, spiced flavor that’s perfect for the holidays.
- Chocolate drizzle: Once your candy has cooled, drizzle some melted chocolate over the top for an extra layer of decadence. You can use dark, milk, or even white chocolate to suit your taste!
- Holiday sprinkles: After pouring your candy onto the baking sheet, sprinkle some festive holiday sprinkles on top along with the crushed candy canes for a cheerful touch!
These variations are just the beginning! Feel free to experiment and make this Christmas candy your own. The best part is that each version brings its own festive flair to your holiday gatherings!
Storage & Reheating Instructions
Once you’ve made your delightful Christmas candy, you’ll want to store it properly to keep it fresh and tasty! Here’s how to do just that:
- Store in an airtight container: Make sure to keep your candy in an airtight container to prevent it from becoming sticky or losing its crunch. I like to layer it between sheets of parchment paper to keep the pieces from sticking together.
- Keep it in a cool, dry place: Store the container in a cool, dry spot away from direct sunlight. This helps the candy maintain its texture and flavor for longer.
- Use within a couple of weeks: For the best taste and texture, try to enjoy your Christmas candy within two weeks. Trust me, it’s so good you might not be able to resist it for long!
- No need to reheat: This candy is best enjoyed at room temperature, so there’s no need to reheat it. Just grab a piece and savor that crunchy goodness!
If you happen to have any leftover candy (which is rare, but it happens!), following these storage tips will keep your festive treats delicious for as long as possible. Enjoy every sweet moment!
Nutritional Information Section
When it comes to enjoying your homemade Christmas candy, it’s nice to have an idea of what you’re munching on! Just a quick heads-up: the nutritional values can vary based on the specific ingredients and brands you use, so consider this information as an estimate.
- Serving Size: 1 piece
- Calories: Approximately 100
- Sugar: 20g
- Sodium: 5mg
- Fat: 0g
- Carbohydrates: 25g
- Protein: 0g
- Cholesterol: 0mg
So, while you’re indulging in these delightful treats, just remember that moderation is key—though with how delicious they are, you might find it hard to stop at just one!
FAQ Section
Got questions about making your own Christmas candy? I’ve got you covered! Here are some common inquiries that pop up, along with my friendly answers to help you out.
Can I substitute corn syrup?
Absolutely! If you don’t have corn syrup on hand, you can use honey or maple syrup as a substitute, but keep in mind that it may slightly alter the flavor and texture of your candy.
How do I store leftover candy?
After making your Christmas candy, make sure to store it in an airtight container, layered with parchment paper. This keeps it fresh and prevents it from sticking together. Just remember to keep it in a cool, dry place!
Can I make this candy ahead of time?
Yes, you can! In fact, this candy is perfect for making ahead of time. It stays fresh for about two weeks, so you can prepare it before your holiday gatherings and enjoy it later!
What if I don’t have a candy thermometer?
If you find yourself without a candy thermometer, you can use the cold water test instead! Just drop a small amount of the boiling mixture into cold water. If it forms a hard ball, it’s ready! But I highly recommend getting a thermometer for accuracy.
Can I add flavors other than peppermint?
Of course! You can get creative with your flavors. Try almond, vanilla, or even cinnamon for a twist. Just remember to adjust the amount to your taste—start with a small amount and add more if needed!
Is it okay to use different colors?
Definitely! Feel free to use any food coloring you like to match your holiday theme. Get creative with colors, and make it as festive as you want—blue and white can be stunning for a winter wonderland vibe!
What should I do if my candy is too sticky?
If your candy turns out sticky, it may not have reached the correct temperature during cooking. Make sure to monitor the temperature closely next time. If it’s already made, you can try refrigerating it to firm it up a bit!
Can I use this recipe for other occasions?
Absolutely! While this Christmas candy is perfect for the holidays, you can tweak the colors and flavors to make it suitable for birthdays, parties, or any festive occasion. Just have fun with it!
I hope these FAQs help you on your candy-making journey! If you have any more questions or need tips, don’t hesitate to reach out. Happy candy making!