

Oh my goodness, let me tell you about my absolute favorite dessert: Butterscotch Cheesecake! This rich and creamy delight is like a hug in dessert form. The smooth cream cheese perfectly complements the warm, caramel-like sweetness of butterscotch, creating a flavor explosion that’s just heavenly. I remember the first time I made this for a gathering; I was a bit nervous, but once I took that first bite, I was hooked! Everyone couldn’t stop raving about it, and I felt like a superstar in the kitchen. It’s become my go-to for birthdays, holidays, or just because I need a little sweetness in my life. Trust me, once you try it, you’ll be dreaming of this cheesecake long after the last slice is gone!
Ingredients for Butterscotch Cheesecake
Gathering the right ingredients is key to making this Butterscotch Cheesecake truly shine. Here’s what you’ll need:
- 1 1/2 cups finely crushed graham cracker crumbs
- 1/2 cup unsalted butter, melted
- 1 cup packed brown sugar
- 3 packages (8 ounces each) cream cheese, softened
- 1 cup sour cream
- 3 large eggs
- 1 teaspoon pure vanilla extract
- 1 cup butterscotch chips
Make sure to use room temperature cream cheese and eggs for that ultra-smooth filling. It really makes a difference, trust me!
How to Prepare Butterscotch Cheesecake
Preparing this Butterscotch Cheesecake is easier than you might think! Just follow these simple steps, and you’ll have a show-stopping dessert that everyone will love.
Preheat and Prepare the Crust
First things first, preheat your oven to 325°F (160°C). This step is crucial because it ensures even baking. While the oven warms up, grab a mixing bowl and combine your finely crushed graham cracker crumbs with the melted butter. Mix until it resembles wet sand. Now, take a springform pan and press that buttery mixture firmly into the bottom, creating a nice, even layer. I usually spend about 5-7 minutes on this step, but make sure it’s packed tightly because that crust is going to hold all that creamy goodness!
Make the Cheesecake Filling
Next up, let’s whip up that luscious filling! In a large bowl, beat the softened cream cheese and packed brown sugar together until smooth and creamy. This is where room temperature ingredients really shine, so don’t skip this! After that, add in the sour cream, eggs, and pure vanilla extract. Mix everything until it’s well combined and silky-smooth—about 2-3 minutes should do the trick. Finally, gently fold in those delightful butterscotch chips. Oh man, the smell is already divine!
Bake the Cheesecake
Now it’s time to pour that heavenly filling over your prepared crust. Carefully spread it out to ensure it’s even. Pop the cheesecake into your preheated oven and bake for 55-60 minutes. You’ll know it’s done when the edges are set but the center still has a slight jiggle to it—that’s perfect! Once it’s done baking, turn off the oven and crack the door open, allowing it to cool gradually for about an hour. This helps prevent cracks. After cooling, refrigerate the cheesecake for at least 4 hours, or overnight if you can wait. The flavors deepen and it sets beautifully. Trust me, good things come to those who wait!
Why You’ll Love This Recipe
- Rich, indulgent flavor that combines creamy cheesecake with the sweet charm of butterscotch.
- Super easy to make, even for beginners—just follow the steps and you’ll impress everyone!
- Perfect for gatherings, parties, or just a cozy night in; it’s always a crowd-pleaser!
- Vegetarian-friendly, making it a delightful option for friends and family with dietary preferences.
- The combination of textures—from the buttery crust to the smooth filling—will have you coming back for seconds.
Tips for Success
Alright, let’s ensure your Butterscotch Cheesecake turns out perfectly every time! Here are my top tips for success:
- Ingredient Quality: Always use high-quality cream cheese and butterscotch chips. The flavor really shines through, and trust me, you’ll taste the difference. Look for brands that you love or use in other desserts.
- Room Temperature Ingredients: This is a must! Make sure your cream cheese, eggs, and sour cream are at room temperature before mixing. It helps create that smooth, lump-free batter that we all crave.
- Don’t Overmix: Once you add the eggs, mix until just combined. Overmixing can incorporate too much air, leading to cracks in your cheesecake. We want it smooth and creamy, not airy!
- Monitor Baking Time: Every oven is different, so keep an eye on your cheesecake as it bakes. Check for doneness by gently shaking the pan; the edges should be set, but the center should still have a slight jiggle. This is key for a creamy texture.
- Cooling Technique: After baking, let your cheesecake cool gradually in the oven with the door slightly ajar. This helps prevent cracks from forming due to sudden temperature changes.
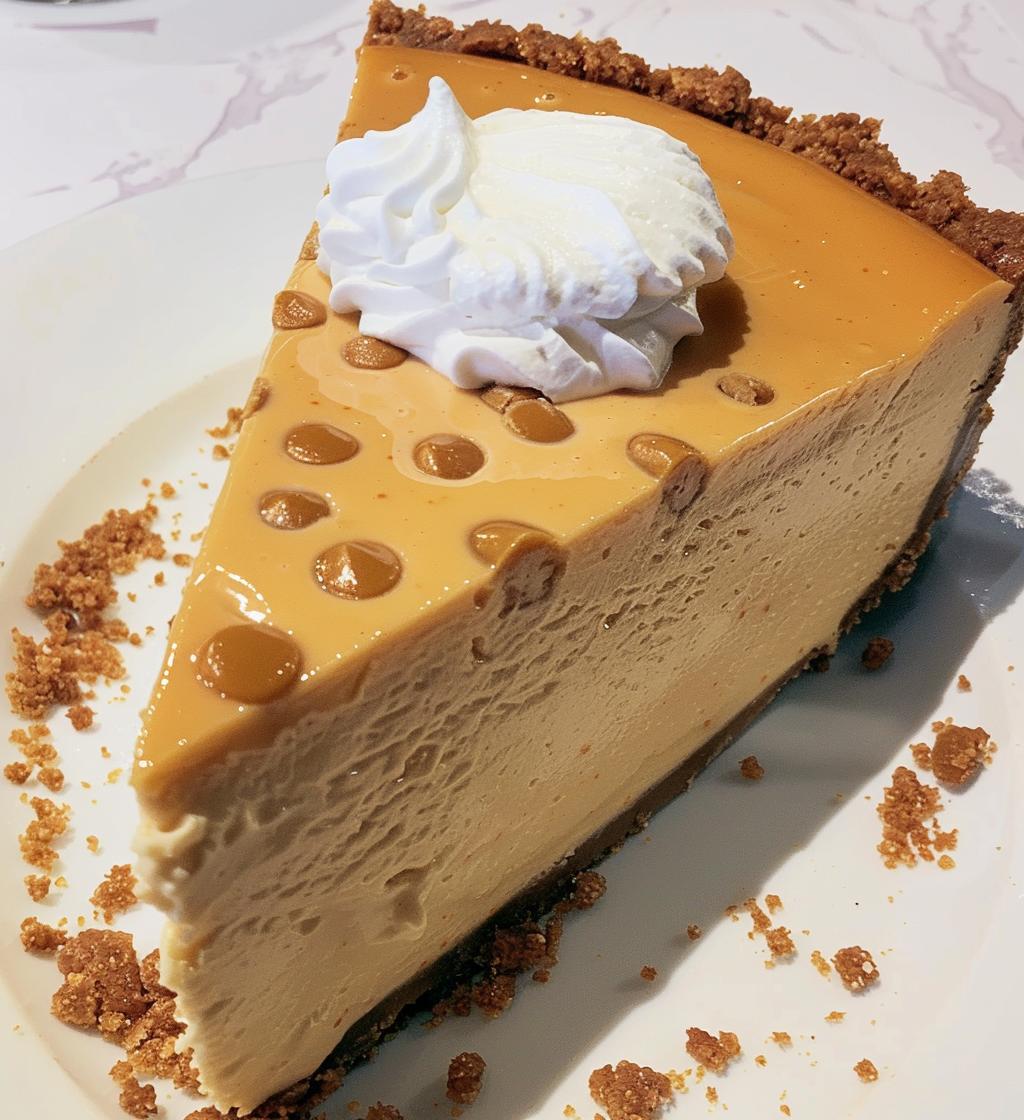
- Serving Suggestions: I love topping my cheesecake with a dollop of whipped cream and a sprinkle of butterscotch chips for that extra touch. You could also drizzle some caramel sauce for a decadent finish!
- Chill Time: Patience is key! Allow your cheesecake to chill in the fridge for at least 4 hours, but overnight is even better. It lets the flavors meld beautifully and ensures the perfect texture.
Follow these tips, and you’ll be well on your way to making a Butterscotch Cheesecake that everyone will rave about!
Variations of Butterscotch Cheesecake
If you’re feeling adventurous, there are so many fun ways to switch up this Butterscotch Cheesecake! For a chocolate twist, try adding semi-sweet chocolate chips along with the butterscotch chips—it’s a match made in heaven. If you want to add a little crunch, sprinkle some chopped nuts, like pecans or walnuts, on top before baking; the texture contrast is delightful!
If you’re looking for a gluten-free option, simply substitute the graham cracker crumbs with ground almonds or gluten-free cookie crumbs. You can also get creative with the toppings! A drizzle of caramel sauce or a sprinkle of sea salt can elevate the flavors even more. Trust me, the possibilities are endless, and each variation brings its own delicious charm to the table!
Storage & Reheating Instructions
To keep your Butterscotch Cheesecake fresh and delicious, store any leftovers in an airtight container in the refrigerator. It’ll stay tasty for up to 5 days—if it lasts that long! If you’re like me, there’s usually not much left after a gathering, but it’s nice to have a slice or two for later.
If you prefer your cheesecake slightly warm, you can reheat individual slices in the microwave for about 10-15 seconds. Just be careful not to overdo it, as you want to maintain that creamy texture. Enjoy your sweet treat again with all its delightful flavors intact!
Nutritional Information
Here’s a quick look at the estimated nutritional information for a slice of my Butterscotch Cheesecake. Keep in mind that these values are based on typical ingredients and can vary slightly depending on what you use:
- Calories: 350
- Fat: 22g
- Saturated Fat: 12g
- Unsaturated Fat: 8g
- Trans Fat: 0g
- Cholesterol: 80mg
- Sodium: 220mg
- Carbohydrates: 30g
- Fiber: 1g
- Sugar: 25g
- Protein: 5g
This cheesecake is definitely a treat, so enjoy it in moderation! Each slice is rich, creamy, and packed with flavor—worth every calorie, in my opinion!
FAQ About Butterscotch Cheesecake
Got questions about making this delicious Butterscotch Cheesecake? Don’t worry, I’ve got you covered! Here are some common queries I often get:
Can I use a different type of sugar?
Absolutely! You can substitute granulated sugar for brown sugar if you prefer a lighter flavor, but keep in mind that brown sugar adds that lovely caramel note we love in butterscotch.
What if my cheesecake cracks?
Oops! Cracks can happen, but don’t fret. To prevent them, make sure to mix your batter just until combined and avoid overbaking. If cracks do appear, a dollop of whipped cream or a drizzle of caramel can beautifully disguise them!
Can I make this cheesecake ahead of time?
Yes! This cheesecake actually tastes even better after a day in the fridge as the flavors meld together. Just be sure to cover it well to keep it fresh.
How should I serve it?
I love serving mine chilled with a generous swirl of whipped cream and a sprinkle of extra butterscotch chips on top. It’s a showstopper that never fails to impress!
Feel free to reach out if you have more questions—I’m here to help you create the perfect cheesecake!