

Oh my goodness, if you’ve never tried Biscoff Banana Pudding, you’re in for a treat! This dessert combines the spiced, caramel goodness of Biscoff cookies with the creamy sweetness of banana pudding, and I just can’t get enough of it. What I love most? It’s a no-bake wonder! Seriously, you can whip it up in no time and let the fridge do all the work while you kick back and relax. This recipe is perfect for gatherings, potlucks, or just a cozy night in when you need a little indulgence. Trust me, once you take a bite, you’ll be hooked on this delightful combination!
Ingredients List
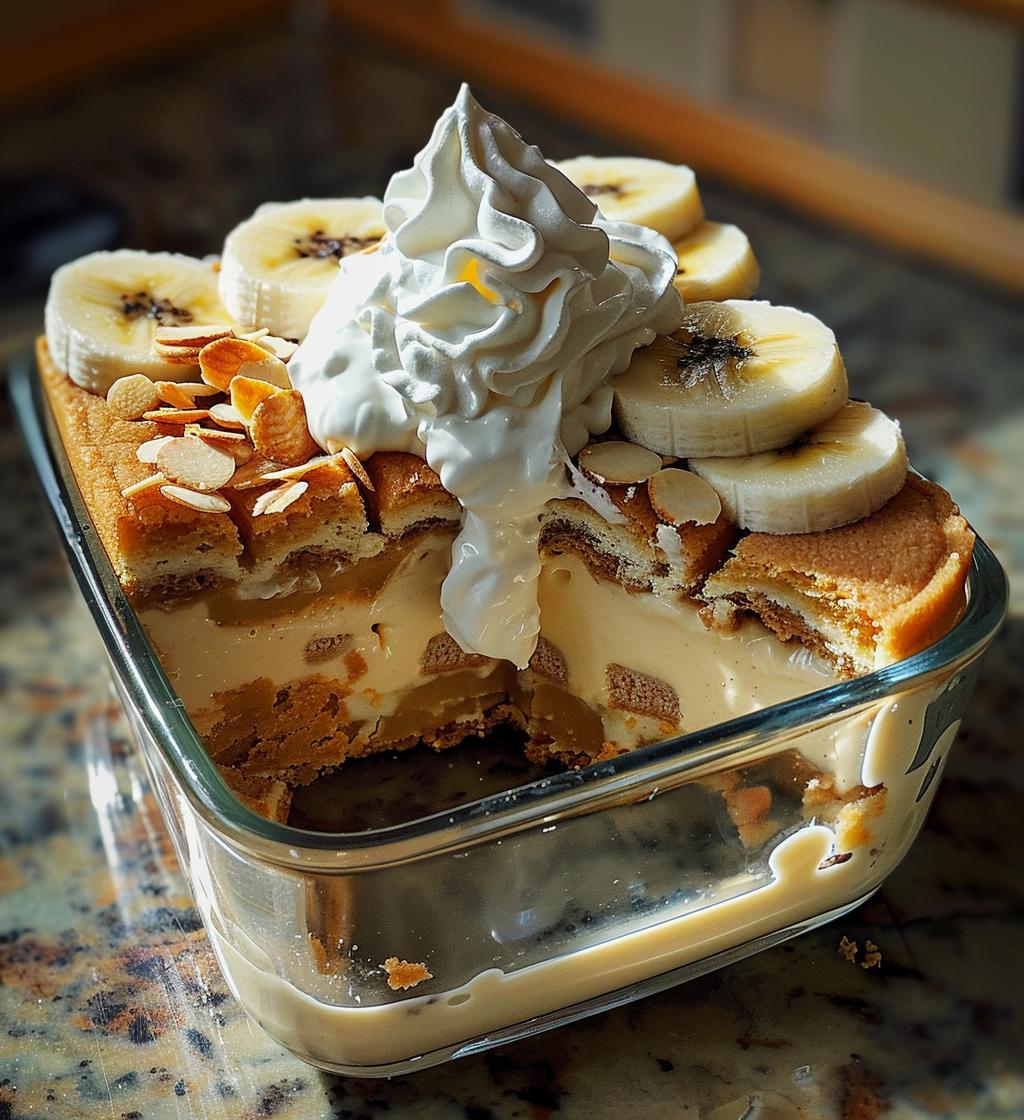
- 1 package Biscoff cookies (these are the star of the show!)
- 2 ripe bananas, sliced (the riper, the sweeter!)
- 2 cups vanilla pudding (store-bought or homemade, your choice!)
- 1 cup whipped cream (for that fluffy, dreamy topping)
- 1/2 cup milk (helps to make the pudding extra smooth)
- 1 teaspoon vanilla extract (just a little for that extra flavor boost)
How to Prepare Biscoff Banana Pudding
Prepare the Vanilla Pudding
First things first, let’s get that vanilla pudding ready! Follow the package instructions, which usually involve mixing the pudding mix with milk. Make sure to whisk it really well until you achieve a smooth consistency. You want it to be creamy and lump-free, so take your time with this step. If you want to take it up a notch, let it sit for a few minutes after whisking—this helps it thicken up nicely!
Combine Ingredients
Now that your pudding is looking good, it’s time to mix in the milk and vanilla extract. Pour in the milk (that half cup we talked about) and add that teaspoon of vanilla extract. Stir gently but thoroughly to ensure everything is well combined. You want all those flavors to blend, and trust me, this little bit of vanilla makes a world of difference!
Layer the Biscoff Banana Pudding
Alright, let’s get to the fun part—layering! Grab your serving dish and prepare for some delicious assembly. Start with a layer of Biscoff cookies at the bottom; they create a lovely crunchy base. Don’t worry about them breaking, it adds to the charm!
Creating the Base Layer
To create the base layer, simply take a few Biscoff cookies and arrange them neatly at the bottom of your dish. You can break them up a bit to fill in the gaps; every little bit counts in this dessert! This is where that amazing flavor journey begins.
Adding Bananas and Pudding
Next up, it’s banana time! Carefully add a layer of sliced bananas on top of those cookies. I like to be generous here, so don’t skimp on the bananas! Once you’ve got those in place, pour half of your creamy pudding mixture over the bananas. Make sure to spread it out evenly so every bite has that delightful flavor.
Repeat the Layers
Now, let’s repeat the layers! Add another round of Biscoff cookies right on top of that pudding layer, followed by more slices of banana. Seriously, you can’t go wrong with more bananas! Finally, pour the remaining pudding mixture over everything, ensuring it covers all the delicious layers. It’s looking like a masterpiece already!
Top with Whipped Cream
To finish this beauty off, grab your whipped cream and dollop it generously on top! You can spread it out for a nice smooth finish, or just make it fluffy and fun—whatever you prefer! This is the crowning touch that makes it feel extra special. Plus, it’s so pretty, you’ll want to show it off!
Chill and Serve
Now, here comes the hardest part—waiting! Cover your dish and pop it in the refrigerator for at least 2 hours. This chilling time is crucial because it allows all those flavors to meld together and makes the pudding nice and firm. When you’re ready to serve, just scoop it out and enjoy the bliss of this Biscoff Banana Pudding! Trust me, it’s worth the wait!
Why You’ll Love This Recipe
- It’s a no-bake dessert, which means less fuss and more fun!
- Quick to prepare—whip it up in just 15 minutes and let the fridge do the rest!
- Layers of crunchy Biscoff cookies, sweet bananas, and creamy pudding create a texture explosion in every bite.
- Perfect for gatherings—everyone loves this delightful combination!
- Customizable with your favorite add-ins or toppings—get creative!
- Great for both kids and adults; it’s a dessert that appeals to everyone!
- It can easily be made ahead of time, making it a stress-free option for parties.
Tips for Success
Alright, let’s chat about how to make your Biscoff Banana Pudding truly unforgettable! Here are some of my top tips that’ll have you feeling like a dessert rockstar:
- Use the freshest ingredients: Always go for ripe bananas—they’re sweeter and more flavorful, which makes a world of difference in this pudding.
- Don’t rush the pudding: When preparing your vanilla pudding, really take your time to whisk it until it’s super smooth. Lumps are a no-go! If you let it sit for a few minutes after mixing, it thickens beautifully.
- Layer it up: Don’t be shy with your layers! A generous amount of Biscoff cookies and bananas ensures every spoonful is packed with flavor. Feel free to add more layers if your dish allows for it!
- Chill time is key: Be patient and let it chill for at least 2 hours. This step is crucial for the flavors to meld and for the pudding to set properly. Trust me, it’s worth the wait!
- Presentation matters: When topping with whipped cream, have fun with it! Whether you pipe it on for a fancy look or just dollop it on, make it visually appealing. A sprinkle of crushed Biscoff cookies on top can add a nice touch too!
- Serve it cold: This dessert is best served chilled, so make sure to keep it in the fridge until it’s time to dig in. No one wants a warm pudding!
With these tips in your back pocket, you’ll be well on your way to creating a Biscoff Banana Pudding that’s sure to impress! Enjoy the process and happy cooking!
Nutritional Information
Alright, let’s talk numbers! Here’s a rough estimate of the nutritional values per serving of this delicious Biscoff Banana Pudding. Keep in mind that these values can vary based on the specific brands of ingredients you use, so it’s always good to check labels for the most accurate info:
- Calories: 250
- Fat: 10g
- Saturated Fat: 5g
- Unsaturated Fat: 3g
- Trans Fat: 0g
- Cholesterol: 15mg
- Sodium: 150mg
- Carbohydrates: 35g
- Fiber: 1g
- Sugar: 15g
- Protein: 3g
This pudding is not just a treat for your taste buds, but it’s also a dessert that fits nicely into your day! Enjoy every creamy, cookie-crunching bite without guilt!
FAQ Section
Can I use homemade pudding instead of store-bought?
Absolutely! If you have a favorite homemade vanilla pudding recipe, go for it! Just make sure it’s chilled before layering, and it’ll add a lovely personal touch to your Biscoff Banana Pudding.
How long does Biscoff Banana Pudding last in the fridge?
It’ll stay delicious in the fridge for about 3 to 4 days. Just make sure to cover it tightly to keep it fresh. But trust me, it’s so good; it might not last that long!
Can I make this dessert ahead of time?
Yes! This no-bake dessert is perfect for making a day in advance. Just let it chill overnight, and you’ll have a fantastic treat ready to impress when you need it!
What other toppings can I add?
You can get creative with toppings! Think crushed Biscoff cookies for extra crunch, chocolate shavings for a sweet twist, or even a drizzle of caramel sauce. The possibilities are endless!
Is this recipe suitable for a gluten-free diet?
To make it gluten-free, simply swap the Biscoff cookies for a gluten-free alternative. There are some great gluten-free cookies out there that will work wonderfully in this recipe!
Storage & Reheating Instructions
Alright, let’s talk about how to keep your Biscoff Banana Pudding fresh and delicious! After you whip up this creamy delight, it’s important to store it properly to maintain its amazing taste and texture. Here’s what you need to know:
- Store in the fridge: Keep your Biscoff Banana Pudding in an airtight container or cover it tightly with plastic wrap. It’ll stay fresh in the refrigerator for about 3 to 4 days. Just remember to keep it chilled until you’re ready to serve!
- Don’t freeze: While it may be tempting to freeze leftovers, I wouldn’t recommend it for this dessert. The creamy pudding and whipped cream can lose their lovely texture once thawed, so enjoy it fresh instead!
- Serving suggestions: When you’re ready to dig in, just scoop out what you want. If it’s been sitting in the fridge for a while, give it a gentle stir to bring back that creamy goodness before serving. You can even add a little extra whipped cream on top to freshen it up!
By following these simple storage tips, you can enjoy your Biscoff Banana Pudding for days without losing that delightful flavor and texture. Happy indulging!
Print
Spiced Pumpkin Walnut Cake
- Prep Time: 20 minutes
- Cook Time: 45 minutes
- Total Time: 1 hour 5 minutes
- Yield: 8 servings 1x
- Category: Dessert
- Method: Baking
- Cuisine: American
- Diet: Vegetarian
Description
A delicious and moist cake made with pumpkin puree, walnuts, and dried apricots, spiced with cinnamon, ginger, and nutmeg.
Ingredients
- 200 g (1 ½ cups) pumpkin puree
- 150 g (1 cup) chopped dried apricots
- 100 g (1 cup) chopped walnuts
- 150 g (1 ¼ cups) all-purpose flour
- 1 tsp baking powder
- ½ tsp baking soda
- ¼ tsp salt
- 1 tsp ground cinnamon
- ½ tsp ground ginger
- ¼ tsp ground nutmeg
- 100 g (½ cup) unsalted butter, melted
- 150 g (¾ cup) brown sugar, packed
- 3 large eggs
- 60 ml (¼ cup) milk
- 1 tsp vanilla extract
For the delightful cinnamon drizzle, you will need:
- 100 g (½ cup) powdered sugar
- 1–2 tbsp milk
- ½ tsp ground cinnamon
Instructions
- Preheat your oven to 350°F (175°C) and prepare a 9-inch round cake pan by greasing it and lining the bottom with parchment paper.
- In a medium bowl, whisk together the dry ingredients: flour, baking powder, baking soda, salt, cinnamon, ginger, and nutmeg.
- In a large bowl, combine the wet ingredients: melted butter, brown sugar, eggs, milk, and vanilla extract, mixing until smooth.
- Gradually fold the dry ingredients into the wet mixture until just combined.
- Fold in the chopped walnuts and dried apricots until evenly distributed.
- Pour the batter into the prepared cake pan and smooth the top. Bake for 40–45 minutes, or until a toothpick inserted in the center comes out clean.
- Allow the cake to cool in the pan for 10 minutes, then transfer to a wire rack to cool completely. Drizzle with cinnamon glaze before serving.
Notes
- For a gluten-free version, substitute all-purpose flour with a gluten-free flour blend or almond flour.
- Store leftovers wrapped tightly at room temperature for up to three days, or refrigerate for up to a week.
- For a vegan version, replace eggs with flaxseed meal or applesauce and use plant-based milk.
Nutrition
- Serving Size: 1 slice
- Calories: 250
- Sugar: 15g
- Sodium: 150mg
- Fat: 10g
- Saturated Fat: 4g
- Unsaturated Fat: 6g
- Trans Fat: 0g
- Carbohydrates: 35g
- Fiber: 2g
- Protein: 4g
- Cholesterol: 50mg
Keywords: pumpkin cake, walnut cake, apricot cake, spiced cake, fall dessert