

Oh, the joy of making festive treats during the holidays! There’s just something magical about standing in the kitchen, the scent of baked goods swirling around, and the laughter of family echoing as we whip up something special together. My absolute favorite has to be Christmas cake pops. They’re like little bites of joy on a stick! I remember the first time I made them with my niece; we ended up with more frosting on our faces than on the cake pops! Each one is a canvas for creativity, decorated with colorful sprinkles that catch the eye and taste of sweet nostalgia. Trust me, these delightful little treats are the perfect way to spread holiday cheer, whether you’re sharing them at a party or gifting them to friends and family. Plus, they’re so much fun to make together!
Ingredients List
Here’s everything you’ll need to whip up these festive Christmas cake pops. I promise, it’s super simple and totally worth it!
- 1 box of chocolate cake mix – Any brand you love will do just fine!
- 1 cup of frosting – You can use store-bought or homemade; I usually go for vanilla!
- 1 cup of white chocolate chips – These will give your cake pops that smooth, delicious coating.
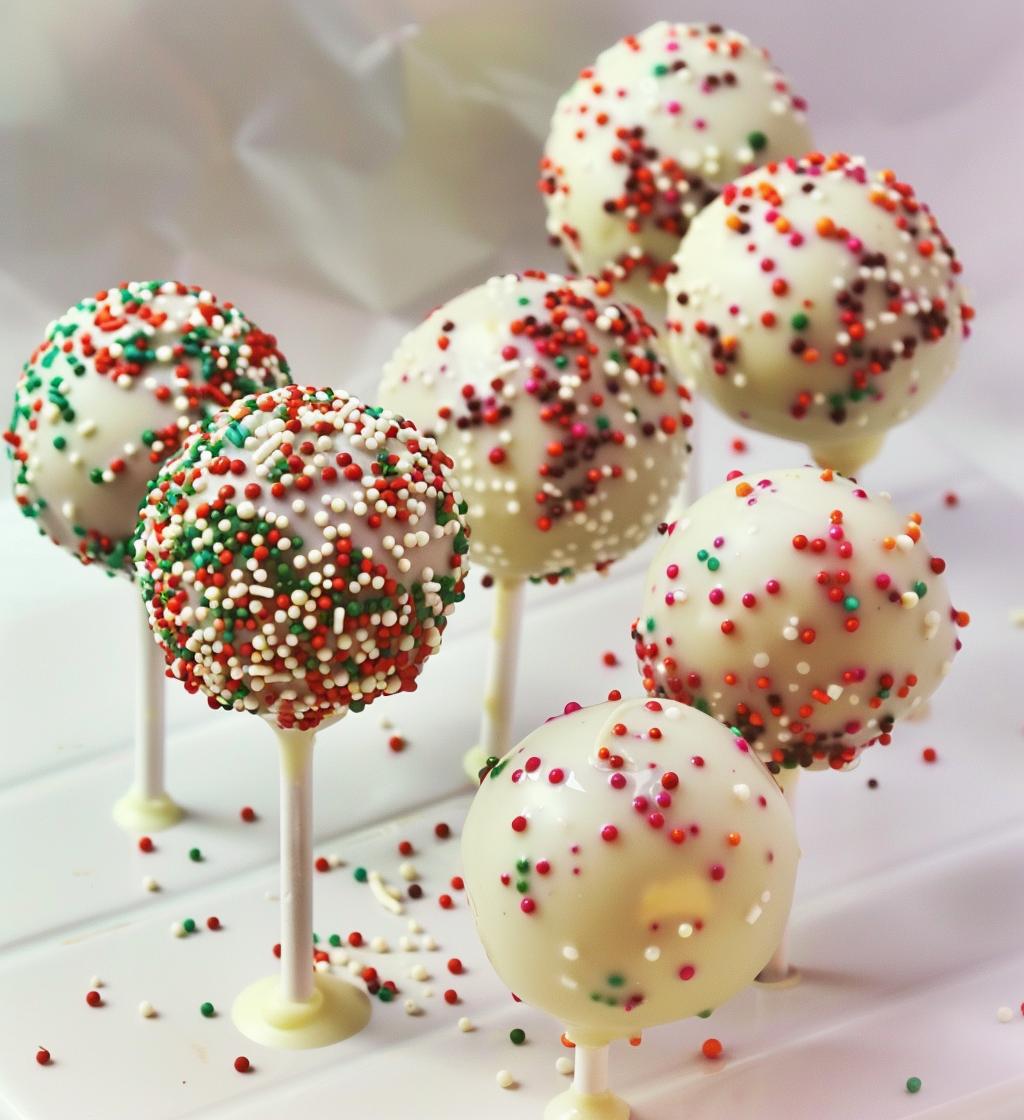
- Sprinkles for decoration – Get creative! Use festive colors to make them pop!
- Wooden sticks – These will be the perfect handles for your cake pops.
Make sure to gather everything before you start, so the process flows smoothly. Happy baking!
How to Prepare Christmas Cake Pops
Get ready to dive into the joyous process of making Christmas cake pops! It’s easier than you think, and I’m here to guide you every step of the way. Let’s bring those festive vibes to life!
Step-by-Step Instructions
Preparing the Cake
First things first! Grab your box of chocolate cake mix and follow the package instructions to prepare the batter. I usually add a splash of vanilla extract because, why not?! Once your cake is baked, let it cool completely in the pan. This step is super important because if you try to crumb it while it’s warm, you’ll end up with a messy situation. Trust me, nobody wants that!
Mixing and Shaping
Once the cake is cool, it’s time for some fun! Crumble the cake into a large bowl using your hands or a fork; get in there and break it down until it’s nice and fine. Now, add in that cup of frosting and mix it all together until it’s well combined. You want to reach a dough-like consistency. Here’s a tip: keep your cake balls uniform in size, about 1 inch in diameter, so they all cook evenly. When you’ve got your mixture just right, roll them into little balls and place them on a baking sheet lined with parchment paper.
Chilling and Coating
Now, let’s chill those cake balls! Pop them in the refrigerator for at least 30 minutes. This helps them hold their shape when we dip them. Meanwhile, melt your white chocolate chips in a microwave-safe bowl. Heat them in 30-second intervals, stirring in between, until they’re smooth and glossy. Oops! Don’t overheat them, or you might end up with a clumpy mess. Once melted, dip the end of each wooden stick into the chocolate and then insert it into a cake ball. This helps the stick stay put! Next, coat each cake pop in the melted chocolate, letting the excess drip off. Finally, sprinkle on those festive decorations while the chocolate is still wet. Place them upright in a stand or foam block to set. And voilà! You’ve got beautiful Christmas cake pops! Enjoy the magic of the season, one bite at a time.
FAQs about Christmas Cake Pops
Can I use different cake flavors?
Absolutely! One of the best things about Christmas cake pops is their versatility. You can use any flavor of cake mix you like—vanilla, red velvet, or even lemon for a refreshing twist! Just remember to pair your frosting with the cake flavor for a cohesive taste. The sky’s the limit, so get creative and use your favorite flavors!
How do I store leftover cake pops?
If you happen to have any leftovers (which is rare in my house!), storing them is super easy. Just place them in an airtight container and keep them in a cool place. They’ll stay fresh for up to a week. If they’re decorated with chocolate, make sure they’re set before stacking them to avoid any smudging. I recommend placing a piece of parchment paper between layers if you have to stack them!
Can I customize the decorations?
Oh, definitely! This is where the fun really begins! You can switch up your sprinkles for different occasions—think red and green for Christmas, pastel colors for Easter, or even themed colors for birthdays. You can also drizzle some melted chocolate or use edible glitter for an extra festive touch. Don’t be afraid to let your creativity shine; each cake pop can be a unique little masterpiece!
Why You’ll Love This Recipe
Let me tell you, there are so many reasons to fall head over heels for these Christmas cake pops! Here are just a few of my favorites:
- Quick to Make: Seriously, you can whip these up in no time! With just a bit of baking and some chilling, you’ll have a batch ready to go!
- Fun for Kids: This is the perfect activity to get the little ones involved. They’ll love shaping the cake balls and decorating them with sprinkles!
- Customizable: You can switch up the flavors and decorations to match any occasion. The possibilities are endless, so have fun with it!
- Perfect for Holiday Gatherings: These bite-sized treats are a hit at parties! They’re easy to share, and everyone loves a little sweetness during the holidays.
Trust me, once you make these, they’ll become a holiday staple in your home! Happy baking!
Tips for Success with Christmas Cake Pops
To make sure your Christmas cake pops turn out absolutely perfect, I’ve got some fantastic tips to share! Trust me, these little nuggets of wisdom will take your cake pops from good to amazing!
- Perfectly Melted Chocolate: When melting your white chocolate chips, heat them gently. Use a microwave-safe bowl and microwave in 30-second intervals, stirring in between. This helps prevent overheating and clumping. If you notice your chocolate getting a bit thick, add a teaspoon of vegetable oil or shortening to thin it out and keep it smooth for dipping.
- Chill, Chill, Chill: Don’t skip the chilling step! It’s crucial for setting the shape of your cake balls and helps with the coating process. If they’re too warm when you dip them, they’ll lose their shape, and nobody wants a wonky cake pop!
- Stick with It: When inserting the wooden sticks, dip the ends into the melted chocolate first. This acts like a glue and keeps the stick from pulling out of the cake pop when you take a bite! Just a little dip goes a long way.
- Sprinkle Magic: Be quick with your sprinkles! Add them while the chocolate coating is still wet, so they stick beautifully. If the chocolate hardens, the sprinkles won’t adhere as well. Get creative with your sprinkle choices for a festive touch!
- Use a Cake Pop Stand: If you can, invest in a cake pop stand or foam block. It keeps your pops upright while they set and prevents any smudging. Plus, it looks cute on your dessert table!
- Experiment with Flavors: Don’t be afraid to mix it up! Try adding a splash of peppermint extract to your frosting for a minty twist or use different flavored chocolates for coating. The flavor combinations can be endless!
- Keep the Workspace Clean: Cake pops can get a bit messy, so I always recommend having some paper towels handy. Clean as you go, and you’ll enjoy the process a whole lot more!
With these tips in your back pocket, you’re all set to create the most delightful Christmas cake pops. Just remember to have fun and let your creativity shine through! Happy baking!
Nutritional Information
Now, let’s talk about the nutritional side of these delightful Christmas cake pops! It’s important to note that nutrition can vary based on the specific ingredients and brands you choose, so the figures I’m sharing are just estimates. Always check the labels for the most accurate information. Here’s a rough breakdown per cake pop:
- Calories: Approximately 150
- Fat: 7g
- Saturated Fat: 4g
- Trans Fat: 0g
- Cholesterol: 20mg
- Sodium: 50mg
- Carbohydrates: 20g
- Fiber: 1g
- Sugar: 12g
- Protein: 2g
Keep in mind that indulging in these festive treats is all about balance and enjoying the moment. So go ahead, treat yourself to a Christmas cake pop or two, and savor every bite! Happy holiday baking!
Serving Suggestions
Now that you’ve got your beautiful Christmas cake pops ready to go, let’s talk about how to serve them up for maximum festive flair! There are so many delightful options to complement these sweet treats, and I can’t wait to share some of my favorites with you!
- Hot Chocolate: Nothing says holiday cheer like a cozy cup of hot chocolate! Serve your cake pops alongside a steaming mug topped with whipped cream and a sprinkle of cocoa. It’s the perfect pairing for a cold winter’s night!
- Eggnog: For a classic holiday drink, offer up some creamy eggnog. The rich flavors of eggnog balance beautifully with the sweetness of the cake pops, making for a festive treat that’s sure to impress!
- Holiday Punch: Create a fun and festive punch to serve with your cake pops. You can mix cranberry juice, ginger ale, and a splash of orange juice for a bubbly, refreshing drink that everyone will love!
- Other Desserts: If you’re hosting a gathering, consider pairing your cake pops with other holiday desserts like gingerbread cookies, peppermint bark, or mini cheesecakes. This creates a delightful dessert spread that will have your guests swooning!
- Fruit Platter: For a touch of freshness, a colorful fruit platter can be a great balance with the sweetness of the cake pops. Think strawberries, kiwi, and clementines for a burst of color and flavor!
With these serving suggestions, you’ll create an inviting and festive atmosphere that’s perfect for sharing joy during the holiday season. So gather your friends and family, and enjoy the delightful combo of flavors that these Christmas cake pops bring to the table!
Storage & Reheating Instructions
Now that you’ve crafted your delightful Christmas cake pops, you’ll want to know how to keep them fresh and tasty! Storing these little bites of joy is super simple, and I’ve got all the tips you need.
If you have any leftovers (which I totally understand if you don’t!), place your cake pops in an airtight container. Make sure they’re set before you stack them to avoid any messy chocolate smudges. I usually separate layers with parchment paper to keep them looking as gorgeous as they did when they were fresh!
Store your cake pops in a cool place, ideally in the refrigerator, and they should stay good for up to a week. Just remember, the longer they sit, the softer they may become, so it’s best to enjoy them within a few days for that perfect texture.
As for reheating, you really don’t need to! These treats are best enjoyed cold, especially with that smooth chocolate coating. If you find them a bit too firm after chilling, just leave them at room temperature for about 10-15 minutes before serving. This way, they’ll soften a bit, and you can savor that delightful bite without the chill. Trust me, they’re still just as delicious, and you’ll love every bite!
So go ahead and store those cake pops with confidence, and enjoy them throughout the festive season! Happy snacking!